 Embroidery machine can help you beautify your garments in unlimited ways. You can create designs on the embroidery software and stitch any pattern you want on your fabrics. Embroidery machines let you stitch intricate designs conveniently.
Embroidery is considered a valuable accessory for garments. Royals and noble used to embroidery on their clothes with beautiful stitch designs and make their expensive dresses look more adorable. With time embroidery becomes more popular, and then embroidery machines give it a new direction.
You can now stitch quality designs consistently; on the contrary, it is hard to get consistent hand embroidery designs. There are many ways to create a design and then stitch it using embroidery, and one of them is iron-on patches.
Iron embroidery patches make our fabric look attractive and unique. Many companies stitch their logos as iron-on patches on their garments. Although many pre-made iron patches are present in the market, you can make them yourself according to your ideas and make the fabric look unique and aesthetic.
Many people think making iron-on patches with embroidery machines is complicated, but it is not. All you need to follow the instructions carefully and produce your iron-on patches. Let’s see how to make iron-on patches with embroidery machines.
Items required:
- Patch design
- Editing package like illustrator
- Embroidery software (you can use software that provides a free trial. We are using Drawings software which is easy and simple to use)
- A flash drive to transfer a design from your system to the embroidery machine
- Embroidery machine (We are using one of the best embroidery machines).
- The embroidery hoops which are compatible with your machine
- Stabilizer (it is better to use soluble Aqua stabilizers)
- Fabric (Choose a soft, smooth fabric with durable quality, the material should not stretch unnecessarily or become a hurdle while you are doing embroidery. We are using flag Nylon here for its good standard quality)
- Embroidery thread and bobbin thread (polyester)
- Iron-on backing
- Scissors, iron, and parchment paper
- Paper towels (damp)
- A heat-proof surface (preferably a small glass mirror)
- & Hotknife.
Steps to proceed:
-
Create design:
It is time to choose a design for your iron patch. When you are a beginner, it is better to choose a simple design. If you can create your designs using illustrator any other program, give it a try. First, select your design and then get them into a vector drawing. You can use Inkscape and Illustrator to get the job done.
If you do not know how to use them, watch some tutorials to get the job done. Once your designs are completed, scale them to avoid any discrepancy later on. Save it in the format which is compatible with your embroidery software. Try to use it in some off formats if you are getting error messages repeatedly.
-
Transfer design to stitches:
Once your design is complete and saved into the proper format, transfer it into stitches using embroidery software. You can use any embroidery software; usually, Drawings are the easiest one to use. There are many available online which allow you to use a free trial version.
When you import the vector file to the embroidery software, it will turn the design into stitches. The software will choose the color, and smart software also alters the design according to the fabric you are using.
Here you can make changes like colors which were automatically changed, and the type of stitch you want. For best results, choose a satin stitch that works best for iron patches.
-
Hoop fabric and stabilizer:
Once you have transferred the design into stitches, you can move to the next step, preparing your fabric for the embroidery process. Here you may need a big fabric piece that can stick into the hoop from all sides, and you can also adjust it and grab it properly.
Once the fabric is cut – cut the stabilizer that matches the size of the fabric and then hoops the stabilized material, ensure that fabric is wrinkle-free and entirely taught, then attach the hoop to your embroidery machine arm.
-
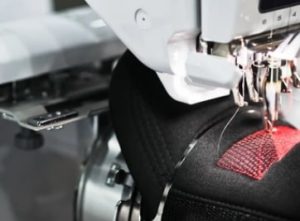
Set embroidery machine:
Once your hoop is attached, set up the embroidery machine, every machine works slightly differently – so make sure you are setting it according to the manual.
Afterward, thread the machine with the required colors you need for the process and begin your journey to stitch. Here ensure that the needle is sharp to avoid any issues. After that, you need to change the thread colors when your embroidery machine stops and asks to do so.
-
Process the design:
Once the embroidery patch is complete, unhoop the garment and cut the edges of the patch roughly. Leave some border for precise finishing at the end. After that, you need to remove the stabilizer. If you use a water-soluble stabilizer, run it under hot water until a patch is released.
For iron-on patches – set the iron settings to the wool and sandwich the patch and iron-on backing between two sheets of paper (parchment). Ensure that patch back is facing up!
Now press it down with your weight of the upper body for around ten seconds and flip the whole product over and repeat the process. Then peel off the backing paper and trim your embroidery patch edges for fine finishing but keep a small border around for a complete look.
-
Hot knife the patch:
HotKnifing the patch means you have reached the last step of your patch embroidery. Take your patch to the heat-proof surface and start the process. When hot-knife is hot, trim the excess fabric around your patch and wipe the melted material after finishing the cut stroke. You can also run the clean hot-knife part along with the corners to seal it properly.
Patch is ready:
Bingo! The patch is ready now; you can iron it into something or stitch the way you want. You will soon learn how to make iron-on patches with an embroidery machine with convenience by following the steps carefully.


